


1 comments
Creating MATHLIT Kits: Math Assistive Technology Hands-On Literature Integration Tool Kits Part II: High-Tech Tools
 0
0
The work of Marilyn Burns supports linking math instruction to children’s literature to spark interest in learning mathematics by building confidence of students who are wary of math, providing real world contexts that bring meaning to math ideas, stimulating student’s imagination, and offering a natural way to connect the abstract ideas, language, and symbols of mathematics to a context that they understand. (For more information visit http://mathsolutions.com/about-us/marilyn-burns/) MATHLIT Kits : Math Assistive Technology Hands-On Literacy Integration Tools contain popular mathematics themed storybooks and low to high tech instructional tools. We shared in our last posting the Low –Tech components of our MATHLIT Kits. Now let’s take a look at how common or free high-tech tools and resources can be used to create math and literature kits with engaging and accessible instructional materials.
The Power of PowerPoint
Microsoft PowerPoint allows teachers to easily create electronic or tangible instructional materials. It also provides opportunities for students to interact with information in a variety of ways including text, graphics, animation, video, and sound. In other words, Multimedia! The following come to mind:- Adapted books
- Instructional aides
- Interactive quizzes
- Jeopardy-style games
- Choose your own adventures
- Graphic organizers Such activities empower students to choose their sequence of learning or receive just in time reinforcement during activities through the use of hyperlinking. PowerPoint features such as Photo Album, Narration, Action buttons, and Animation make Adapted books fun to create and use. Let’s take a closer look at each of these features:
Photo Album
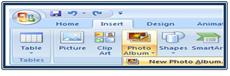
Quickly and easily insert digital photos from home, classroom, or community-based activities using PowerPoint Photo Album. Select on the Insert tab > Photo Album>create new photo album. Choose the photos you would like to use in your adapted book and format as desired.Narration
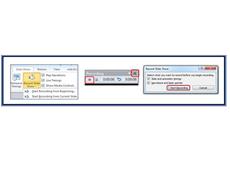
Provide audio recording of text on your slides, or auditory cues to provide additional content on your slides using PowerPoint Narration. Select Slide Show tab > Record Narration (2007 version) or Slide Show tab > Record Slide Show (2010 version). Select whether to: 1) Start recording from beginning or current slide or 2) Save the narration with the slide timings. Select the Start Recording button. The Recording feature appears in the top left corner. When finished narrating a slide, click the arrow or press the right arrow key on the keyboard to advance to the next slide. When finished, click the X on the Recording feature or press the Escape button on the keyboard.Action Buttons
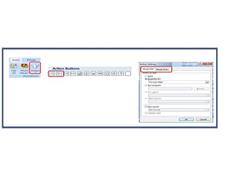
Provide a means to link slides or perform different actions on a slide. In Slide Show mode, clicking the left mouse button or pressing the right arrow key advances to the next slide. Pressing the left arrow key plays the previous slide. Another option is to place action buttons on the slides to advance the slides forward or back with a mouse click. On the Insert tab, in the Illustrations group, select the Shapes button. In the menu that appears, select an Action Button. Click on the area of the slide to place the button on the slide. Drag to resize it. In the dialog box that appears, select whether the action occurs on Mouse Click or Mouse Over (hover). Select OK. When the presentation is in Slide Show mode, the action buttons will be active.Animation
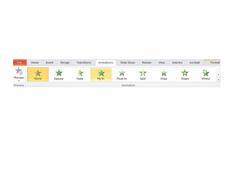
Add movement and pop to graphics in your PowerPoint! Click on the graphic you want to animate. Select the Animations tab. Select the drop-down arrow to see the full menu of choices. Hover the cursor over the animation choice to see a preview of the action. Click your animation choice. Choose to either start with mouse click or automatically (with or without previous). Animation duration time can be customized.Excelling with Excel
Data literacy allows students to ask and answer meaningful questions by collecting, analyzing and making sense of the data encountered in real life. Building data literacy makes for a richer, more meaningful learning experience. Excel provides quick and easy ways for students to be engaged in turning data they collect into sleek professional looking charts and/or graphs. Excel is a wonderful tool for creating colorful, fun, interactive learning environments. With just a little customization and the basic understanding of how Excel works, you and your students can create wonderful learning activities! - Class Pictogram
- Pizza Calculator (See attached file)
- M&M Activity
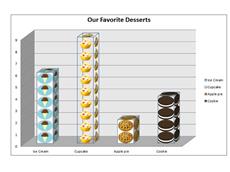
Pictograms, bar graphs, and pie charts offer students multiple ways to visualize and investigate data. As students organize and analyze data, they ask meaningful questions and dig deeper to solve problems. Moving beyond simply memorizing facts, students acquire the skills of reasoning, inquiry and communication. For example, in the MATHLIT Kit using Sir Cumference and Off- the-Charts Desserts book you could have the student create a class pictogram of their favorite desserts. Refer to our cheat sheet in the Related Content for below this blog for instructions.
The Word on Word
Microsoft Word is great to use to create adapted lessons, worksheets, quizzes, and other learning materials for students to independently access and manipulate. Creating templates, item banks, customized graph paper, pictures in tables, and using the Equation and Symbol Tools make it easy to create engaging learning materials and can save you time.Templates
Saving files as templates allows teachers to create documents that students can use everyday such as worksheets, tests, projects, instructional aides. Students can manipulate the document and save their work without being able to change the original document. Templates provide students with a framework so they can focus on entering content instead of focusing on organizing their responses. To make any file a Word template select File > Save as > Word TemplateItem Banks
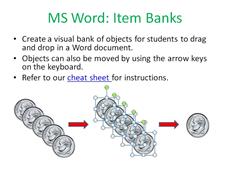
These virtual manipulatives allow students to display their knowledge by moving graphics within a document using a mouse or keyboard instead of drawing, writing, or handling objects. - Great for students with fine-motor challenges!
- Worksheets
- Assessments
- Interactive classroom activities
- great for interactive white boards
Create a visual bank of objects for students to drag and drop in a Word document. Objects can also be moved by using the arrow keys on the keyboard. Refer to our cheat sheet for instructions.
Pictures in Tables
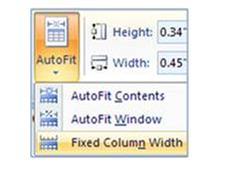
Pictures provide students with visual prompts to complete an activity. You can create interactive lessons, worksheets, and quizzes that can be completed on the computer or printed for offline use. Have you ever inserted a picture in to a MS Word table and the whole table turns into the picture. In the easy step below pictures drop into a table with very little formatting needed.
- Insert a table into the document. Highlight the cells.
- Select the Layout tab > AutoFit > Fixed Column Width.
Pictures inserted into the table will be consistent with the table column width no need to resize! Refer to our cheat sheet in the Related Content below this blog for instructions.
MS Word: Equation and Symbol Tools
Everyday educators and tutors struggle in creating math worksheets because typing equations and using math symbols can be really time consuming. Have you tried the Equation and Symbol Tools in MS. Word? Talk about a real time saver!To create equations and insert additional mathematical symbols into equations: On the Insert tab, in the Symbols group, explore the Equation and Symbol tools.
OneNote
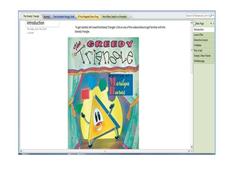
Think of it as an electronic Trapper Keeper™. Imagine a notebook where you can easily embed text, images, screenshots, video, audio, and even handwritten notes, making it easy to collect and organize information. How could this be useful in the classroom? For the MATHLIT Kits we are creating a OneNote Notebook that contains all the lessons and activities for each book. Amazing! Here is a picture of the Greedy Triangle in our OneNote notebook. Notice the tabs across the top are titles to our MATHLIT Kits and the pages on the right side of the notebook are pages within each book in this case the Greedy Triangle.OneNote offers powerful tools that are easy to use:
- Sound recorder
- Screen clipping
- Attach a file Refer to our cheat sheet in the Related Content below this blog for instructions.** Quick Videos
- What is OneNote?
- Keep It Together with OneNote
We have created an Edmodo MATHLIT group at www.edmodo.com to share our MATHLIT Kit resources in folders for you to access. You can begin building your own MATHLIT Kit library by downloading the files for each book and printing and creating the materials/activities for each book title. We will continue to add resources over time! Our Group Code is 8zcx2u. If you are new to Edmodo, you will need to first create a free teacher account. Then join our group by entering the 8zcx2u code. We hope that this will be an ongoing collaborative site where you will post comments, your favorite math websites, and resources that you have created or discovered Refer to our cheat sheet in the Related Content below this blog for instructions on how to get started in Edmodo.
About this member
Dr. Cindy Feist and Dr. Tara Jeffs are assistive technology specialists for Loudoun County Public Schools in Virginia. They are passionate about exploring, learning, and integrating common and cutting edge assistive technologies and facilitating universal design for learning in pre-K through high school general and special education classrooms.